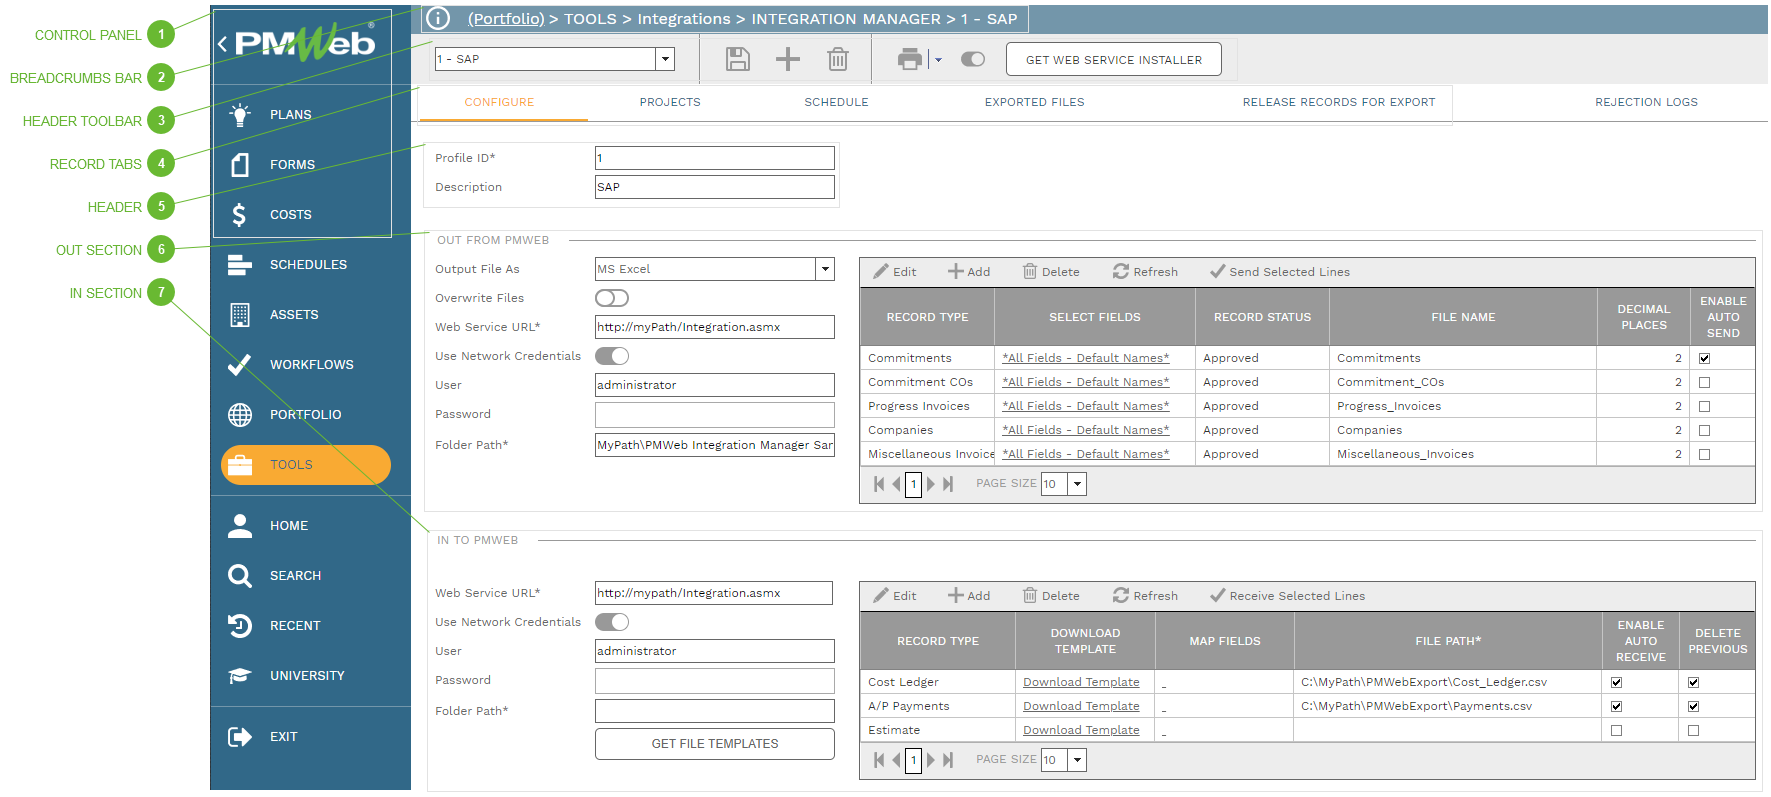
Integration Manager allows PMWeb to send and receive data in simple, easy-to-use, flat file exchanges. Multiple profiles can be configured and scheduled to run periodically.
Get Web Service Installer Button - Click this button to open a Web page from which you can download the Web service that powers Integration Manager and a help document about it.
Projects Tab - Use this tab to select which programs and projects are included in the Integration Manager profile. Drag folders and/or individual projects from the All Projects section and drop them on the Selected Projects section.
Schedule Tab - Use this tab to schedule the profile to automatically run at regular intervals.
View Exported Files Tab - Use this tab to view a read only log of files sent out from PMWeb.
Release Records for Export Tab - When a file is sent out from PMWeb by Integration Manager it is automatically flagged to prevent it from being sent again. If you wish to remove the Sent flag from one or more files you can do so using this tab. Use the filters to narrow down the number of files show in the table, select the ones you wish to remove the flags from, and click the Release Selected Records button.
Rejection Logs Tab - When records are brought in to PMWeb, Integration Manager enforces all of the business rules and settings defined in the system. If incoming records are found to violate any of these, or if required information is missing from the incoming files, they are not brought in and a log entry is made in this tab.
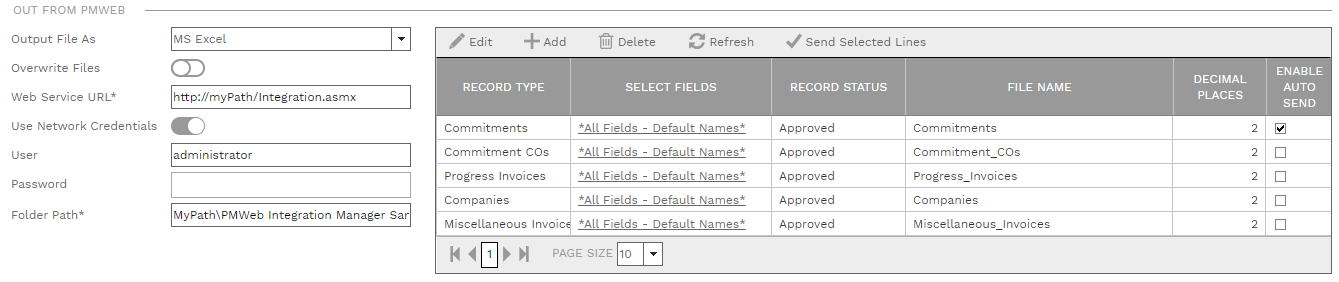
Output File As Field - Select a format for the files created by Integration Manager. Formats include:
MS Excel
Text (Comma Delimited)
Text (Tab Delimited)
Text (Pipe Delimited)
XML
Overwrite Files Switch - If this is turned on, Integration Manager overwrites files with the same name in the output directory. If not, files are appended to the directory with a time and date stamp.
Web Services URL Field - Required. Enter the URL where the Integration Web service is installed.
Use Network Credentials Switch - Turn on to use network credentials when running the Web service
User Field - Enter the Windows user name
Password Field - Enter the password for the Windows user
Folder Path Field - Required. Enter a folder path where Integration Manager will create and save output files.
Send Selected Lines Button - Select one or more lines in the Out From table and then click this button to immediately run the profile for those record types.
Out From Table - Each line in this table represents a record type that will be eligible to send data out from PMWeb each time the profile runs.
Record Type - Select a PMWeb record type from the dropdown list
Select Fields Link - If you select "*Customized*" the Select Fields Dialog opens. When the line is not in edit mode, clicking the hyperlink in this field does the same thing.
Record Status Field - Select one or more record statuses. Only records with the selected status will be included in the output file.
File Name - Enter a name for the output file
Decimal Places Field - Enter the number of decimal places for numbers in the output file. Numbers will be padded with zeroes if necessary.
Enable Auto Send - Check this box to include the line each time the scheduler runs.
Receive Selected Lines Button - Select one or more lines in the In To PMWeb table and then click this button to immediately run the profile for those record types.
In To Table - Each line in this table represents a record type that will be eligible to receive data each time the profile runs.
Record Type Field - Select a PMWeb record type from the list
Download Template Link - Click this link to open a Web page from which you can download the an Excel workbook formatted as a template for the file you will be bringing into PMWeb.
File Path Field - Required. Enter the path where the Integration Manager Web service will find the input files
Enable Auto Receive Checkbox - Check this box to include the line each time the scheduler runs
Delete Previous Checkbox - If this box is checked, each time the Integration Manager Web service is run, all PMWeb records created previously by this line and this profile will be deleted and replaced with records from the latest input file.