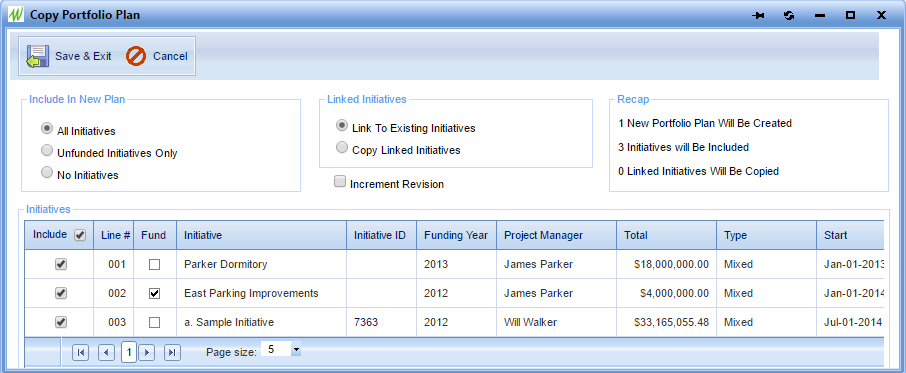
Clicking the button opens the Copy Portfolio Plan dialog. The dialog allows you to configure options before actually creating a copy of the Portfolio Planning Worksheet.
Include in New Plan Section
Select one of the radio button options:
All Initiatives - if this is selected all of the lines in the table at the bottom of the dialog are selected by default
Unfunded Initiatives Only - if this is selected only lines with the Fund field unchecked in the table at the bottom of the dialog are selected by default
No Initiatives - if this is selected none of the lines in the table at the bottom of the dialog are selected by default
Linked Initiatives
Select one of the radio buttons:
Link to Existing Initiatives - if this is selected any linked Initiatives eligible to be copied will not be copied but instead only their link will be copied to the new plan
Copy Linked Initiatives - If this is selected any linked Initiatives eligible to be copied will be copied and links to the new Initiatives will appear in the new plan
Increment Revision - if this is checked the Revision will be increased by "1" in the new plan
Recap - this read-only section alerts you as to what will happen with the present configuration
Initiatives Table
Lines with a check in the Include column will be copied into the new plan. The radio buttons at the top of the dialog determine the defaults. Defaults can be overridden by checking or unchecking the boxes manually.
When you are satisfied with the configuration of the dialog click the Save & Exit button. The dialog closes and the new plan is created.
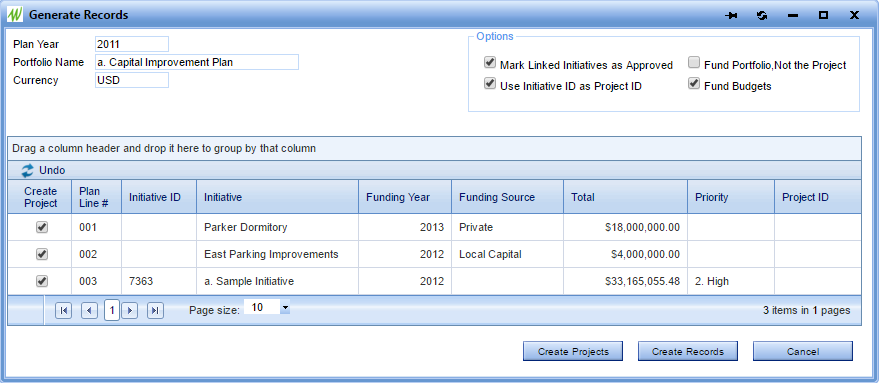
Click the dropdown arrow next to the icon and select "Generate Project Records" to open the Generate Records dialog.
The dialog can be used to generate project, funding and budget records.
To create Projects - select one or more lines in the table using the Create Project checkbox and then click the Create Projects button
To create Budgets and Funding Records - select one or more lines in the table using the Create Records checkbox and then click the Create Records button
Options
Marked Linked Initiatives as Approved - if this is checked, when you create projects the Initiative record linked to the line in the table will automatically have its Status changed to "Approved"
Use Initiative ID as Project ID - if this is checked, when you create projects the Initiative ID shown in the table will be used as the project's ID. If this is unchecked, or if no Initiative ID is shown in the table, sequential IDs will be automatically assigned to the projects.
Fund Portfolio, Not the Project - if this is checked, a single Funding record is created for the sum of the Total field for lines selected in the table and the record will be assigned to the "Portfolio" level. (You can reallocate the funding to programs or individual projects later. See Funding for more information. If this is unchecked, a separate Funding record is created for each line selected in the table and record will be assigned to the "Project" level and tied to the new project.
Fund Budgets - if this is checked, each line in the budgets being generated is funded 100%. See Budgets for more information.
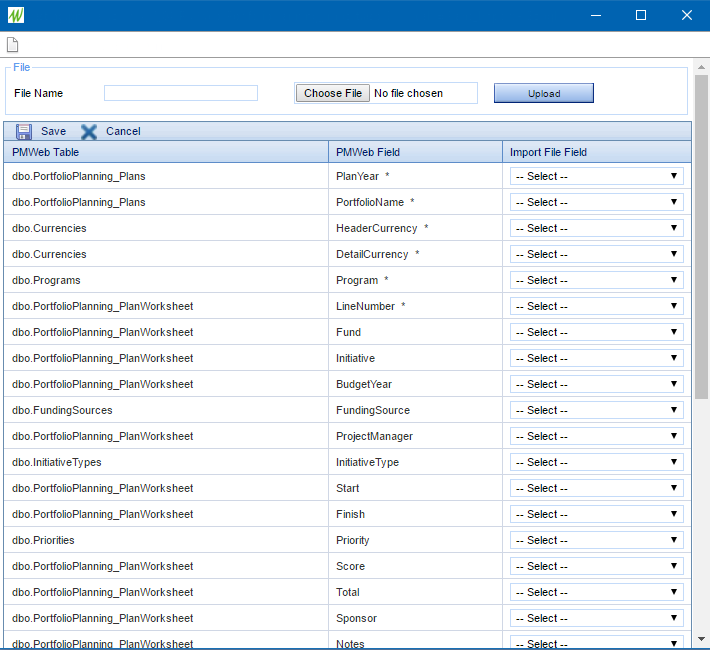
Click the dropdown arrow next to the icon and select "Records" to open the Import dialog.
This dialog can be used to import Portfolio Planning Worksheets from a properly formatted Excel spreadsheet file. See Import Dialog for general information about importing records.