PMWeb can link to special export files created by Autodesk Revit models and use them to create takeoff lines in an Estimate. This topic discusses how linking to Revit works.
Preparing the Revit File
Create an empty Microsoft Excel workbook and save it in this format: Excel 97-2003 (*.xls).
Open an Autodesk Revit project.
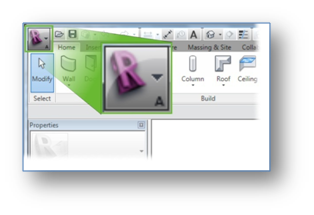
Click the Home button above the ribbon. The menu opens.
Select Export/ODBC Database from the menu. The Select Data source dialog opens.
Click the Machine Data Source tab, select Excel Files in the list and click the OK button. The Select Workbook dialog opens.
Navigate to the workbook you created in step 1, select it and click the OK button. The dialog closes and the data from your Revit project is written to the workbook.
Linking to a PMWeb Estimate
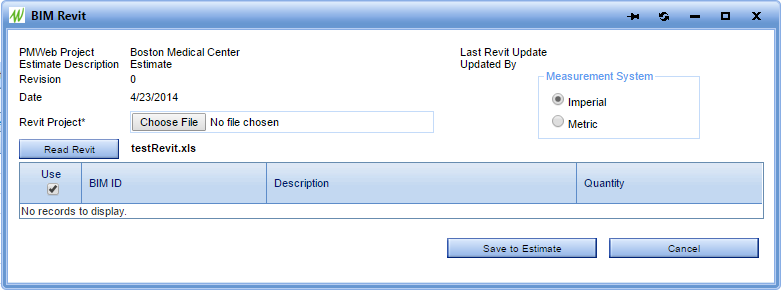
In PMWeb, open an estimate.
Click the dropdown arrow next to the icon and select "Revit" from the list. The BIM Revit dialog opens. (Any other values in this list are for future use.)
Click the Browse button. The Choose File to Upload dialog opens.
Navigate to the workbook you created above, select it and click the Open button. The Choose File to Upload dialog closes and the file path and name appear in the Revit Project field in the BIM Revit dialog.
Click the Read Revit button. PMWeb reads the workbook and then displays takeoff data it extracts in the dialog grid.
Click the Save to Estimate button. The dialog closes and your Revit takeoff data is added to your PMWeb estimate.
Understanding the Revit File
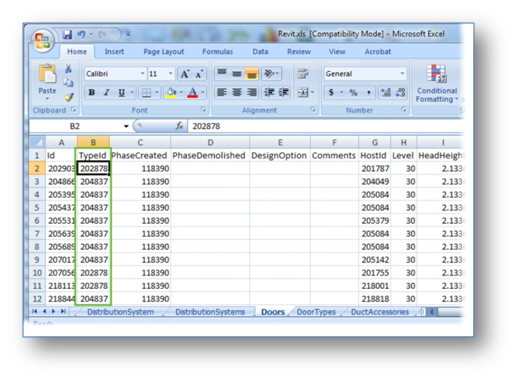
Open the workbook you created above. You can see that a number of tabs – AirTerminals, AirTerminalTypes, AreaLoads, Areas, etc. – have been added by Revit. On each new tab a number of header columns – Id, Typeid, PhaseCreated, PhaseDemolished, etc. – appear. The headers that appear on each tab vary, depending on the type of data Revit stores there. Some tabs (BuildingTypeSettings, for example) contain data that is not relevant to takeoff and will therefore be ignored when you link to PMWeb.
Understanding How PMWeb Reads the Revit File
When you click the Read Revit button in the BIM Revit dialog, PMWeb inspects each relevant tab in the Revit file, groups lines by the Typeid column, quantifies that type, matches the type to PMWeb items and displays the results in the BIM Revit dialog grid. When you click the Save to Estimate button the items and quantities are copied into the estimate and PMWeb inserts the appropriate unit costs which it extracts from matching items in the items catalog.
See the next section for some important points to keep in mind when linking Revit to PMWeb.
Key Points to Successful Linking
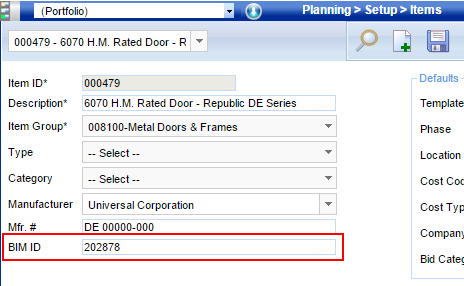
PMWeb matches the Typeid field in the Revit file to the BIM ID field in the PMWeb Items catalog. If no item in the PMWeb catalog contains a BIM ID matching a Revit Typeid, that Typeid is ignored and will not be displayed in the BIM Revit dialog grid.
PMWeb quantifies Revit instances differently, depending on their type. For example, doors are counted and summed by each instance but floors are quantified as the sum of the Area column.
Some tabs in the Revit file are ignored by PMWeb. The BuildingTypeSettings tab, for example, does not contain data that is relevant for takeoff and so is ignored when you click the Read Revit button.
Estimates can be imported from a properly formatted Excel spreadsheet. Two options are available: "Import Estimate" and "Import Estimates Detail". Estimate refers to the fields in the header of the record and Estimates Detail refers to the line items.
See Import Dialog for general information about importing records.
Four types of records can be generated from Estimates: Budgets, Commitments, Procurements, and Budget Requests.
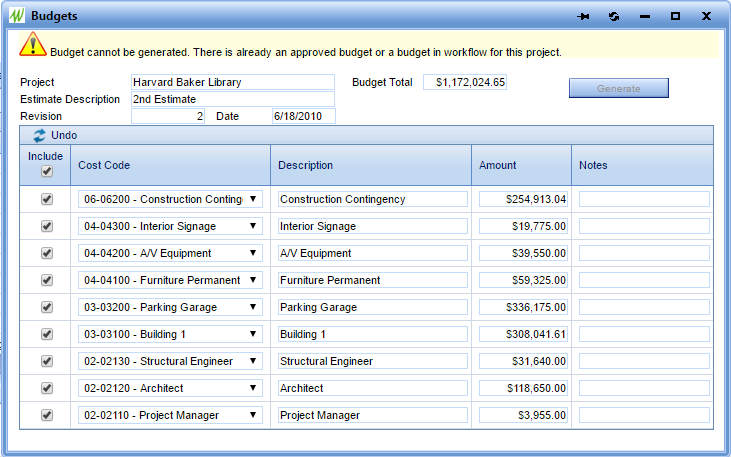
Generate Budgets
Click the dropdown arrow next to the icon and select "Budgets" from the list. The Generate Budgets dialog opens.
PMWeb groups all of the lines in the Details tab of the estimate by Cost Code, sums them, and shows the results in the table in this dialog. Place a checkmark next to the lines you wish to include in the budget and then click the Generate button. A new record is created in the Cost Management module under Budgets. If you wish, you can select a different Cost Code, edit the Description, and add Notes to the table before generating. Note that in the example shown above the Generate button is not available to click. This is because, as the warning message states, a budget already exists for the project. That budget must be marked as Rejected, Withdrawn or must be deleted before another can be generated from an estimate.
Generate Commitments
Click the dropdown arrow next to the icon and select "Commitments" from the list. The Generate Commitments dialog opens.
PMWeb groups all of the lines in the Details tab of the estimate by Company, sums them, and shows the results in the table in this dialog. Plave a checkmark next to the lines you wish to create commitments for and then click the Generate button. A new record is created for each selected line in the Cost Management module under Commitments. If you wish, you can select a different Company and Commitment Type, or edit the Description before generating. A warning icon will be displayed if a commitment has already been generated from the estimate for the selected company although you can click the Generate button and create another one if you wish.
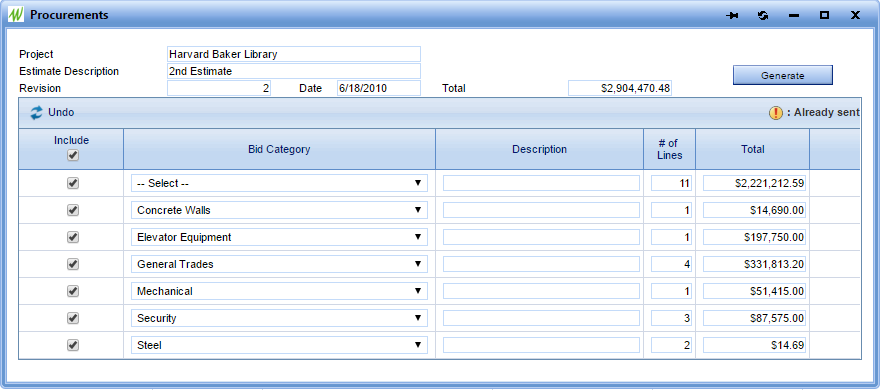
Generate Procurements
Click the dropdown arrow next to the icon and select "Procurements" from the list. The Generate Procurements dialog opens.
PMWeb groups all of the lines in the Details tab of the estimate by Bid Category, sums them, and shows the results in the table in this dialog. Place a checkmark next to the lines you wish to create procurement records for and then click the Generate button. A new record is created for each selected line in the Planning module under Procurement. If you wish, you can select a different Bid Category and edit the Description before generating. A warning icon will be displayed if a procurement record has already been generated from the estimate for the selected bid category although you can click the Generate button and create another one if you wish.
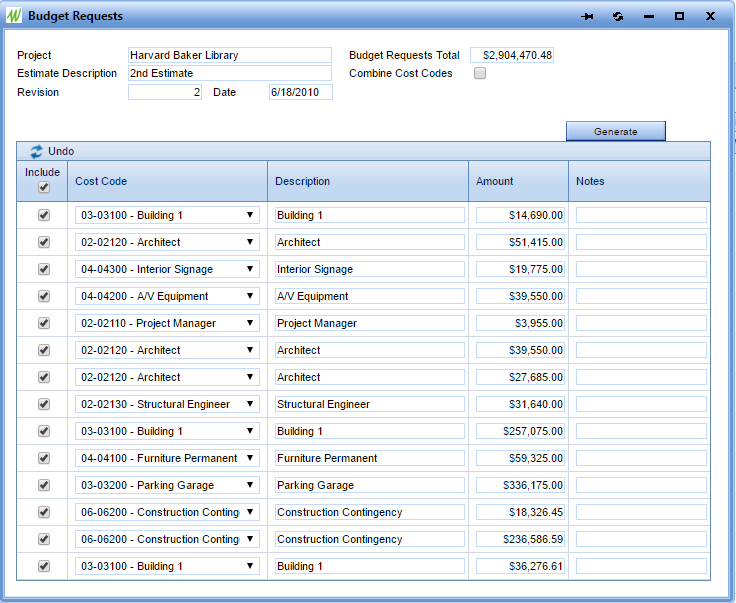
Generate Budget Requests
Click the dropdown arrow next to the icon and select "Budget Requests" from the list. The Generate Budget Requests dialog opens.
All lines from the Details tab of the estimate that contain Cost Codes are displayed in the table in this dialog. If you check the "Combine Cost Codes" box at the top of the dialog PMWeb will group the lines by Cost Code and sum them. Place a checkmark next to the lines you wish to include in the budget request and then click the Generate button. A new record is created in the Cost Management module under Budget Requests. Each checked line in the dialog will correspond to a line in the budget request. If you wish, you can select a different Cost Code and edit the Description and Notes before generating.